1. go语言开发环境
2. vim设置,Vundle安装,fatih/vim-go安装
3. gopls插件手动安装
1. 安装Go语言开发环境
参考:https://www.runoob.com/go/go-environment.html
安装包下载地址为:https://golang.org/dl/ 。
如果打不开可以使用这个地址:https://golang.google.cn/dl/ 。
1、下载二进制包:go1.4.linux-amd64.tar.gz (选择最新版就好)
|
1 |
wget https://golang.google.cn/dl/go1.20.4.linux-amd64.tar.gz |
2、将下载的二进制包解压至 /usr/local 目录。
|
1 |
tar -xzvf go1.20.4.linux-amd64.tar.gz && mv go /usr/local/go-1.20.4 |
3. 增加软链接
|
1 |
rm /usr/local/go && ln -s /usr/local/go-1.20.4 /usr/local/go |
4、将 /usr/local/go/bin 目录添加至PATH环境变量:
|
1 |
export PATH=$PATH:/usr/local/go/bin |
然后重启一下XShell链接,应该就可以尝试 go version命令查看版本号了。
2. vim设置,Vundle配置。
1、下载Vundle源码
|
1 |
git clone https://github.com/VundleVim/Vundle.vim.git ~/.vim/bundle/Vundle.vim |
2、配置vimrc (这个是我自己的配置)
|
1 2 3 4 5 6 7 8 9 10 11 12 13 14 15 16 17 18 19 20 21 22 23 24 25 26 27 28 29 30 31 32 33 34 35 36 37 38 39 40 41 42 43 44 45 46 47 48 49 50 51 52 53 54 55 56 57 58 59 60 61 62 63 64 65 66 67 68 69 70 71 72 73 74 75 76 77 78 79 80 81 82 83 84 85 86 87 88 89 90 91 92 93 94 95 96 97 98 99 100 101 102 103 104 105 106 107 108 109 110 111 112 113 114 115 116 117 |
set nocompatible " be iMproved, required filetype off " required " set the runtime path to include Vundle and initialize set rtp+=~/.vim/bundle/Vundle.vim call vundle#begin() " alternatively, pass a path where Vundle should install plugins "call vundle#begin('~/some/path/here') " let Vundle manage Vundle, required Plugin 'VundleVim/Vundle.vim' " The following are examples of different formats supported. " Keep Plugin commands between vundle#begin/end. " plugin on GitHub repo "Plugin 'tpope/vim-fugitive' " plugin from http://vim-scripts.org/vim/scripts.html " Plugin 'L9' " Git plugin not hosted on GitHub "Plugin 'git://git.wincent.com/command-t.git' " git repos on your local machine (i.e. when working on your own plugin) "Plugin 'file:///home/gmarik/path/to/plugin' " The sparkup vim script is in a subdirectory of this repo called vim. " Pass the path to set the runtimepath properly. "Plugin 'rstacruz/sparkup', {'rtp': 'vim/'} " Install L9 and avoid a Naming conflict if you've already installed a " different version somewhere else. " Plugin 'ascenator/L9', {'name': 'newL9'} Plugin 'fatih/vim-go' " All of your Plugins must be added before the following line call vundle#end() " required filetype plugin indent on " required " To ignore plugin indent changes, instead use: "filetype plugin on " " Brief help " :PluginList - lists configured plugins " :PluginInstall - installs plugins; append `!` to update or just :PluginUpdate " :PluginSearch foo - searches for foo; append `!` to refresh local cache " :PluginClean - confirms removal of unused plugins; append `!` to " auto-approve removal " see :h vundle for more details or wiki for FAQ " Put your non-Plugin stuff after this line " if v:lang =~ "utf8$" || v:lang =~ "UTF-8$" set fileencodings=ucs-bom,utf-8,latin1 endif set nocompatible " Use Vim defaults (much better!) set bs=indent,eol,start " allow backspacing over everything in insert mode "set ai " always set autoindenting on "set backup " keep a backup file set viminfo='20,\"50 " read/write a .viminfo file, don't store more " than 50 lines of registers set history=50 " keep 50 lines of command line history set ruler " show the cursor position all the time " Only do this part when compiled with support for autocommands if has("autocmd") augroup redhat autocmd! " In text files, always limit the width of text to 78 characters " autocmd BufRead *.txt set tw=78 " When editing a file, always jump to the last cursor position autocmd BufReadPost * \ if line("'\"") > 0 && line ("'\"") <= line("$") | \ exe "normal! g'\"" | \ endif " don't write swapfile on most commonly used directories for NFS mounts or USB sticks autocmd BufNewFile,BufReadPre /media/*,/run/media/*,/mnt/* set directory=~/tmp,/var/tmp,/tmp " start with spec file template autocmd BufNewFile *.spec 0r /usr/share/vim/vimfiles/template.spec augroup END endif if has("cscope") && filereadable("/usr/bin/cscope") set csprg=/usr/bin/cscope set csto=0 set cst set nocsverb " add any database in current directory if filereadable("cscope.out") cs add $PWD/cscope.out " else add database pointed to by environment elseif $CSCOPE_DB != "" cs add $CSCOPE_DB endif set csverb endif " Switch syntax highlighting on, when the terminal has colors " Also switch on highlighting the last used search pattern. if &t_Co > 2 || has("gui_running") syntax on set hlsearch endif filetype plugin on if &term=="xterm" set t_Co=8 set t_Sb=m set t_Sf=m endif " Don't wake up system with blinking cursor: " http://www.linuxpowertop.org/known.php let &guicursor = &guicursor . ",a:blinkon0" set tabstop=4 set softtabstop=4 set shiftwidth=4 set number |
3、打开Vim,执行 :PluginInstall 即可
安装完成后,很多人会报错gopls的问题,解决方法在下面。
3. gopls插件手动安装
1、下载golang-tools源码
|
1 |
git clone https://gitee.com/tkxiong/golang-tools.git golang.org/x/tools |
Ps. 源码地址在:https://github.com/golang/tools,只是因为下载太慢,所以用gitee复制了仓库。
所以每次下载的时候都需要同步一下远程仓库。
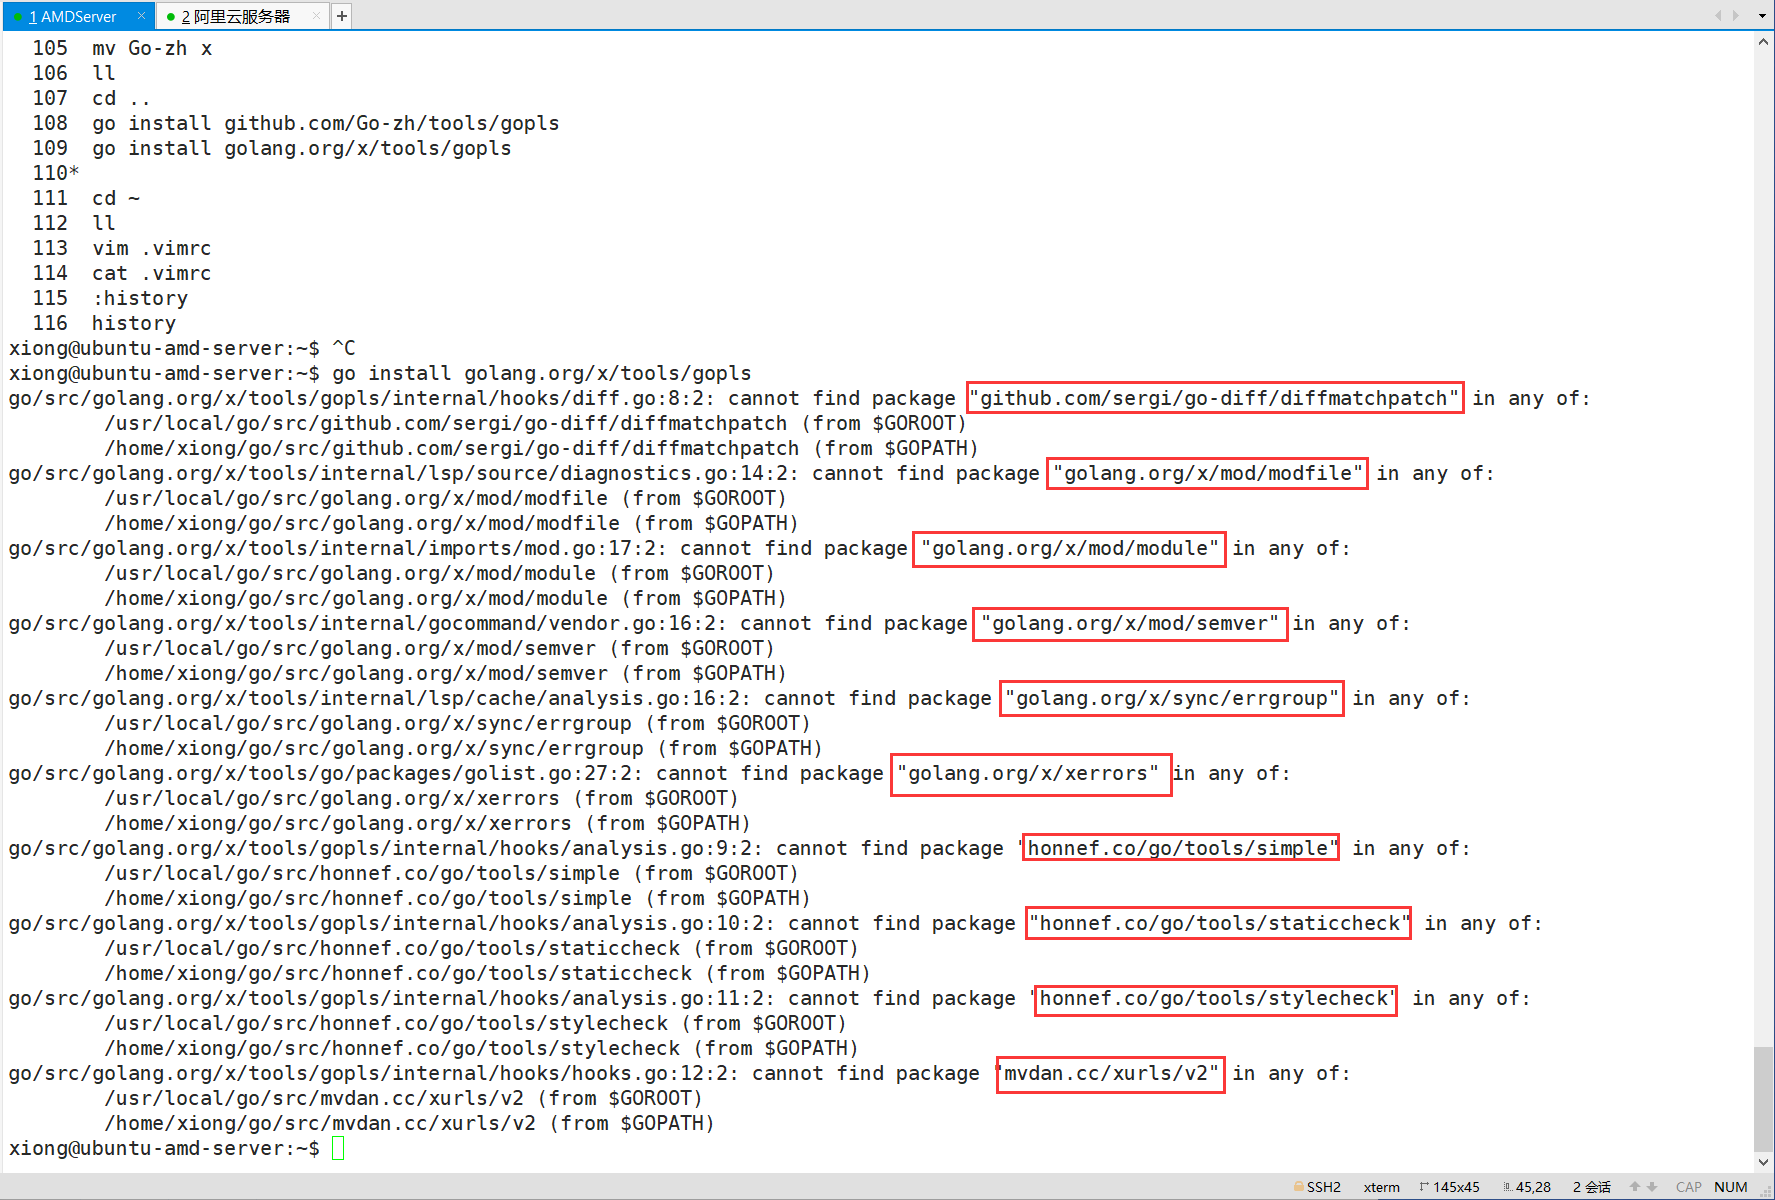
2. 使用 go install 命令尝试安装 gopls
|
1 |
go install golang.org/x/tools/gopls |
P.s. 这里会有大量报错,我们依次来解决。

这里的意思是,缺少了这些源码文件。
如果我们用 go get 的话,它会自动下载这些文件,但是因为网络问题,还是会下载失败。没事,我们可以手动下载。
go get 设置方法点击这里就好。
步骤如下:
- 在github上找到这些源码并下载,并按对应的文件夹排列
- 重新执行 go install 命令安装gopls
P.S. 我的当前目录: ~/go/src
1. 安装 github.com/sergi/go-diff
源码地址在:https://github.com/sergi/go-diff ,因为它很小,所以很快就下载好了。
|
1 |
git clone https://github.com/sergi/go-diff.git github.com/sergi/go-diff |
当然你现在可以执行一次 go install 命令,看看效果。
2. 安装 golang.org/x/mod
源码地址在:https://github.com/golang/mod
但是因为下载比较慢,所以克隆到了gitee.
地址是:https://gitee.com/tkxiong/golang-mod
|
1 |
git clone https://gitee.com/tkxiong/golang-mod.git golang.org/x/mod |
3、安装golang.org/x/sync
源码地址在:https://github.com/golang/sync
克隆Gitee地址在:https://gitee.com/tkxiong/golang-sync
|
1 |
git clone https://gitee.com/tkxiong/golang-sync.git golang.org/x/sync |
4、 安装golang.org/x/xerrors
源码地址在:https://github.com/golang/xerrors
克隆Gitee地址在:https://gitee.com/tkxiong/golang-xerrors
|
1 |
git clone https://gitee.com/tkxiong/golang-xerrors.git golang.org/x/xerrors |
5、安装 honnef.co/go/tools
源码地址在:https://github.com/dominikh/go-tools
克隆Gitee地址在:https://gitee.com/tkxiong/honnef.co-go-tools
|
1 |
git clone https://gitee.com/tkxiong/honnef.co-go-tools.git honnef.co/go/tools |
6. 安装 github.com/BurntSushi/toml
GitHub源地址:https://github.com/BurntSushi/toml
克隆Gitee地址:https://gitee.com/tkxiong/BurntSushi-toml
|
1 |
git clone https://gitee.com/tkxiong/BurntSushi-toml.git github.com/BurntSushi/toml |
7、安装 mvdan.cc/xurls
GitHub源地址:https://github.com/mvdan/xurls
克隆Gitee地址:https://gitee.com/tkxiong/mvdan.cc-xurls
|
1 |
git clone https://gitee.com/tkxiong/mvdan.cc-xurls.git mvdan.cc/xurls |
下载完之后,再执行,
|
1 |
go install golang.org/x/tools/gopls |
没有报错,就是成功了。
go get使用不了的解决办法:
参考链接:https://www.sunzhongwei.com/problem-of-domestic-go-get-unable-to-download
七牛云的 go module 镜像。
参考 https://github.com/goproxy/goproxy.cn。
golang 1.13 可以直接执行:
|
1 2 |
go env -w GO111MODULE=on go env -w GOPROXY=https://goproxy.cn,direct |
然后再次使用 go get 下载 gin 依赖就可以了。为七牛云点个赞。
阿里云 Go Module 国内镜像仓库服务
除了七牛云,还可以使用阿里云的 golang 国内镜像。
https://mirrors.aliyun.com/goproxy/
设置方法
|
1 2 |
go env -w GO111MODULE=on go env -w GOPROXY=https://mirrors.aliyun.com/goproxy/,direct |
我用的第一种,亲测可用。
