继续:cocos2d 复习资料2:
11.了解cocos2d坐标系:
Cocos2d坐标系和OpenGL坐标系一样,原点为屏幕左下角,x向右,y向上。
世界坐标系(World Coordinate) VS 本地坐标系(Node Local)
世界坐标系也叫做绝对坐标系,是游戏开发中建立的概念。因此,“世界”指游戏世界。cocos2d中的元素是有父子关系的层级结构,我们通过Node的setPosition设定元素的位置使用的是相对与其父节点的本地坐标系而非世界坐标系。最后在绘制屏幕的时候cocos2d会把这些元素的本地坐标映射成世界坐标系坐标。
本地坐标系也叫相对坐标系,是和节点相关联的坐标系。每个节点都有独立的坐标系,当节点移动或改变方向时,和该节点关联的坐标系将随之移动或改变方向。
12.锚点和坐标的相对关系:
将一个节点添加到父节点里面时,需要设置其在父节点上的位置,本质上是设置节点的锚点在父节点坐标系上的位置。
三段代码,自己运行看看:
|
1 2 3 4 5 6 7 |
auto red = LayerColor::create(Color4B(255, 100, 100, 128), visibleSize.width/2, visibleSize.height/2); auto green = LayerColor::create(Color4B(100, 255, 100, 128), visibleSize.width/4, visibleSize.height/4); red->addChild(green); this->addChild(red, 0); |
|
1 2 3 4 5 6 7 8 9 10 11 |
auto red = LayerColor::create(Color4B(255, 100, 100, 128), visibleSize.width/2, visibleSize.height/2); red->ignoreAnchorPointForPosition(false); red->setAnchorPoint(Point(0.5, 0.5)); red->setPosition(Point(visibleSize.width/2 + origin.x, visibleSize.height/2 + origin.y)); auto green = LayerColor::create(Color4B(100, 255, 100, 128), visibleSize.width/4, visibleSize.height/4); green->ignoreAnchorPointForPosition(false); green->setAnchorPoint(Point(1, 1)); red->addChild(green); this->addChild(red, 0); |
|
1 2 3 4 5 6 7 8 9 10 |
auto red = LayerColor::create(Color4B(255, 100, 100, 128), visibleSize.width/2, visibleSize.height/2); red->ignoreAnchorPointForPosition(true); red->setPosition(Point(visibleSize.width/2 + origin.x, visibleSize.height/2 + origin.y)); auto green = LayerColor::create(Color4B(100, 255, 100, 128), visibleSize.width/4, visibleSize.height/4); green->ignoreAnchorPointForPosition(true); red->addChild(green); this->addChild(red, 0); |
13.窗口大小的控制:
在cocos2d里,窗口大小的控制一般在 AppDelegate.cpp这个文件里修改
|
1 2 3 4 5 6 7 8 9 10 11 12 13 14 15 16 17 18 19 20 21 22 23 24 |
//屏幕分辨率大小 glview = GLViewImpl::createWithRect("CasualGame", Rect(0, 0, mediumResolutionSize.width, mediumResolutionSize.height));//屏幕分辨率大小 //设计分辨率大小 // Set the design resolution // ResolutionPolicy::NO_BORDER //设定设计分辨率大小 glview->setDesignResolutionSize( designResolutionSize.width , designResolutionSize.height , ResolutionPolicy::SHOW_ALL ); Size frameSize = glview->getFrameSize(); //修改大小 // if the frame's height is larger than the height of medium size. if (frameSize.height > mediumResolutionSize.height) { director->setContentScaleFactor(MIN(largeResolutionSize.height/designResolutionSize.height, largeResolutionSize.width/designResolutionSize.width)); } // if the frame's height is larger than the height of small size. else if (frameSize.height > smallResolutionSize.height) { director->setContentScaleFactor(MIN(mediumResolutionSize.height/designResolutionSize.height, mediumResolutionSize.width/designResolutionSize.width)); } // if the frame's height is smaller than the height of medium size. else { director->setContentScaleFactor(MIN(smallResolutionSize.height/designResolutionSize.height, smallResolutionSize.width/designResolutionSize.width)); } |
这是三个代码段,可以慢慢看,前面两个比较重要,修改分辨率是匹配用的..
PS.设计分辨率大小和屏幕分辨率大小是有区别的…
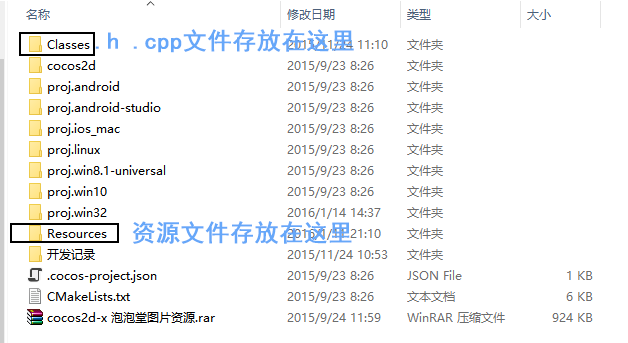
14.新建文件和资源文件的存放位置:
.h .cpp新文件的路径应该在Classes里
资源文件应该在Resources 里
如图:
15.自定义命名空间的使用方法:我晕,这个真是难…
三个文件自己看:
main.cpp
|
1 2 3 4 5 6 7 8 9 10 11 12 13 14 15 16 17 18 19 20 21 22 23 24 25 26 27 28 29 30 31 32 33 34 35 36 |
#include <iostream> #include "namespace.h" using namespace std; using namespace pers; using namespace debts; void other() { Person pr = {"Doodles","Glister"}; ShowPerson(pr); cout << endl; Debt zippy[3]; for(int i=0;i!=3;i++) { GetDebt(zippy[i]); } for(int i=0;i!=3;i++) { ShowDebt(zippy[i]); } cout << "Total debts is: " << SumDebt(zippy,3) << endl; } int main(int argc, char** argv) { Debt debt = {{"Zhang","Fei"},2222.0}; ShowDebt(debt); other(); return 0; } |
namespace.h:
|
1 2 3 4 5 6 7 8 9 10 11 12 13 14 15 16 17 18 19 20 21 22 23 24 25 26 27 28 |
#ifndef NAME_SPACE_H #define NAME_SPACE_H #include <string> namespace pers{ struct Person{ std::string fname; std::string lname; }; void GetPerson(Person &); void ShowPerson(const Person &); } namespace debts { using namespace pers; struct Debt { Person name; double amount; }; void GetDebt(Debt &); void ShowDebt(const Debt &); double SumDebt(const Debt ar[],int n); } #endif |
namespace.cpp
|
1 2 3 4 5 6 7 8 9 10 11 12 13 14 15 16 17 18 19 20 21 22 23 24 25 26 27 28 29 30 31 32 33 34 35 36 37 38 39 40 41 42 |
#include <iostream> #include "namespace.h" namespace pers { void GetPerson(Person & per) { std::cout << "Enter first name:"; std::cin >> per.fname; std::cout << "Enter last name:"; std::cin >> per.lname; } void ShowPerson(const Person & per) { std::cout << per.lname<<","<<per.fname; } } namespace debts { void GetDebt(Debt & debt) { GetPerson(debt.name); std::cout << "Enter debt:"; std::cin >> debt.amount; } void ShowDebt(const Debt & debt) { ShowPerson(debt.name); std::cout << ":$" << debt.amount << std::endl; } double SumDebt(const Debt ar[],int n) { double total = 0; for(int i=0;i!=n;i++) { total += ar[i].amount; } return total; } } |
16.精灵位移,缩放,旋转的控制方法:
move scale rotate(记得这三个词…) 然后是By 和 To
|
1 2 3 4 5 6 7 8 9 10 11 |
//移动的: auto * moveBy = MoveBy::create( 0.5f , Vec2( 1 , 1 )); auto moveTo = MoveTo::create( 0.1f , Vec2( 1 , 1 ) ); //旋转的: auto rotate = RotateBy::create( 0.1f , Vec3( 0.5f , 0.5f , 0.5f ) ); auto rotate = RotateTo::create( 0.1f , Vec3( 0.5f , 0.5f , 0.5f ) ); 缩放: auto scaleBy = ScaleBy::create( 0.5f , 0.5 ); auto scaleTo = ScaleTo::create( 0.5f , 0.1 ); |
By的意思是在原来的基础上增加或者减少这么多,To的意思是到这么多,变成这么多…
17.明确掌握创建物理世界的方法,18.掌握具有物理属性精灵的创建方法
|
1 2 3 4 5 6 7 8 9 10 11 12 13 14 15 |
//物理世界的场景 auto scene = Scene::createWithPhysics(); //重力: Vect gravity(0, -0.5f); scene->getPhysicsWorld()->setGravity(gravity); //用最简单的方式创建刚体 auto body = PhysicsBody::createEdgeBox(Size(visibleSize.width, visibleSize.height), PHYSICSBODY_MATERIAL_DEFAULT, 3); //让刚体加入到物理世界 auto node = Node::create(); node->setPosition(Point(visibleSize.width / 2, visibleSize.height / 2)); node->setPhysicsBody(body); scene->addChild(node); |
PS.以上代码来自网络,并非本人写的…
19.了解物理引擎碰撞监听器的创建:
链接:http://blog.csdn.net/tonny_guan/article/details/39584055
讲的比较详细…可以试试
20.了解cocos2d中内存管理机制中的引用计数机制的核心内容:
虽然我不懂,不过百度很靠谱:
http://blog.sina.com.cn/s/blog_9c2bfc430101b6zt.html
From TK Xiong
欢迎访问: 【cocos2d】复习资料——3

谢谢熊 治好了我的焦躁不安症